Friday, December 13, 2013

Unity Runtime Editing

Skip to end of metadata
Go to start of metadata
In Unity any changes made to a scene while the game is running are not saved, but there is a simple way work around this instead of writing down every variable changed.

Step-by-step guide

  1. run the game and make the required changes to an object.

  2. right click on the object (or script) in the hierarchy and select copy component.
  3. end the running session.
  4. go to the object in the hierarchy or the prefab version in the assets.
  5. right click on the object or script and select paste component as values.

Monday, December 2, 2013

Sale today for students who want a copy of Unity 4 Pro + Team License


The good folks at Studica are offering a Cyber Monday (until Dec 6) sale on Unity 4 Pro licenses.  If you're a student and you want the power of the latest version of Unity Pro, definitely check it out.

It also includes a copy of the Team License (essential for collaboration!).


(One Year License with Team License- windows/Mac Download)
$130

Take care,
-John "Pathfinder" Lester
Chief Learning Officer, ReactionGrid

Monday, September 30, 2013

Jibe Limited Starter Program Now Available

Are you currently in Second Life or OpenSim?

Want to convert your prim-based creations into mesh models that you can bring into a web-based Jibe world? 

You can use the Singularity viewer to export your prims as mesh objects and import them into Unity in a flash.  And our new Jibe Limited package is the best way to start your exploration of Unity3d and Jibe!


Jibe Limited provides a license for a single developer to publish one Jibe world to a hosted web space for 2 months with support for up to 15 concurrent users.

Jibe Limited costs just $25 per month + a one time $25 setup fee.

With the 2 Month Starter Program you get access to documentation and an online support suite to help you along.

After your 2 month term, renewal options at $25 per month will be available as well as upgrade options (e.g., higher concurrency, registration database, inworld metrics).


Jibe Feature Highlights

  • Web-plugin for browser based virtual worlds. 
  • Desktop Windows and Mac standalone version.  
  • Option to convert Jibe world into Android mobile app (additional charge)
  • Group and private chat capable.  
  • Hyperlinks in chat.
  • Sit scripts and related animations provided.
  • Teleport scripts for current level, rooms & Jibe worlds.
  • Free editor at Unity3D for creating the 3D world.
  • Import mesh files from Opensim, Second Life, Sketchup, Maya, 3DS & more.
  • Use Singularity to Export from Second Life or OpenSim as mesh models.
  • Script in industry standard C# or JavaScript.
  • NVIDIA Physx physics system.

For more information and demos of Jibe, please see our website or send us a support ticket with your questions.

Wednesday, July 31, 2013

Oculus Rift and Razer Hydra Integration is Coming Soon to ReactionGrid's Jibe Platform

This short video explains and illustrates the functionality of Oculus Rift and Razer Hydra in a Unity3d-based environment.

The live demo part of this video was filmed in Unity's Tuscan Villa demo environment modified by Sixense, the company that created the Razer Hydra device. We’ll be building on their fantastic work to integrate the Razer Hydra and Oculus Rift with our Jibe platform in the coming months.


At ReactionGrid, we're integrating these new hardware devices with our Jibe virtual world platform, thereby giving people the ability to create their own web-based multiuser 3d environments that are fully immersive.


Wednesday, July 24, 2013

Setting up multiple spawn points for a scene in Jibe and Unity3d

In this tutorial we'll be going over how to set up spawn points when teleporting between Jibe scenes.  By default there is only one spawn point in a scene, this can be inconvenient if you have many exits and only one entrance (ie. buildings). Thankfully setting up spawn point is pretty easy.

First make sure that you have at least two Jibe ready scenes. for the purpose of this tutorial I'll show two blank scenes using the first as a "sender" and the second as a "receiver". Each scene can be used as both "sender" and "receiver" but for simplicity sake I will be separating the two.

Now lets go ahead and set up the receiver scene:

Step 1 - create once cube for every location you want the player to be spawned in and remove any scripts attached to them.

Step 2 - this step is optional but I highly suggest doing it for organization. Name the cubes you created accordingly (ie. clinicSpawn, houseSpawn etc.)

Step 3 - in the NetworkController script there is a list named SpawnPoints. Set up that list to include every point you want to work as a spawn and then write down which index number goes with each spawn point (this will make things easier later).


The receiver scene is now finished and ready to spawn players so next we need to set up the sender scene:

Step 1 - similar to the receiver scene, create a cubes and place the wherever you want the player to teleport from and name them accordingly.

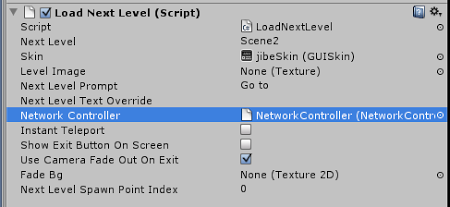
Step 2 - Attach the script LoadNextLevel to each of the sending cubes and set up the script to look like this:


Step 3 - the last variable in the script is called "Next Level Spawn Point Index" this is where you choose which spawn point to spawn at. Remember that list of spawn points you wrote down earlier, this is where you need it, each index number points to a specific spawn point and this variable is how you tell the teleporter where you drop the player off.

Everything should be all set up and ready to go so test away.

P.S. You can also find this article on our Jibe 2.0 Manual Addenda page in our public Knowledge Base!


Wednesday, May 29, 2013

How to create multiuser networked events in Jibe and Unity3d using iTween

In Jibe 2.0 we've included an easy system that gives you the power to use iTween to create multiuser networked events.  This allows you create shared experiences between avatars using interactive and complex object animations.

Watch my tutorial to learn more!


Video: How to create multiuser networked events in Jibe and Unity3d using iTween


Take care,
-John "Pathfinder" Lester
Chief Learning Officer

ReactionGrid, Inc.

Monday, April 29, 2013

How to create Avatar Sit locations on any object in a Jibe world in Unity3d


Here's a short tutorial video that will show you how to create avatar sit locations on any object in your Jibe world.  It's a very powerful and flexible system where you simply drag and drop sit locations onto anything in your multiuser Jibe world, allowing you to easily create collaborative meeting environments that encourage avatars to gather together in groups.
In this video, I also review how to avoid the accidental misuse of a script that could potentially cause your Avatar to fall through the floor.  Safety First!


Creating Sit Locations in Jibe and Unity3d from John Lester on Vimeo.

Take care,
-John "Pathfinder" Lester
Chief Learning Officer, ReactionGrid