In this tutorial we'll be going over how to set up spawn
points when teleporting between Jibe scenes.
By default there is only one spawn point in a scene, this can be
inconvenient if you have many exits and only one entrance (ie. buildings).
Thankfully setting up spawn point is pretty easy.
First make sure that you have at least two Jibe ready
scenes. for the purpose of this tutorial I'll show two blank scenes using the
first as a "sender" and the second as a "receiver". Each
scene can be used as both "sender" and "receiver" but for
simplicity sake I will be separating the two.
Now lets go ahead and set up the receiver scene:
Step 1 - create once cube for every location you want the
player to be spawned in and remove any scripts attached to them.
Step 2 - this step is optional but I highly suggest doing it
for organization. Name the cubes you created accordingly (ie. clinicSpawn,
houseSpawn etc.)
Step 3 - in the NetworkController script there is a list
named SpawnPoints. Set up that list to include every point you want to work as
a spawn and then write down which index number goes with each spawn point (this
will make things easier later).
The receiver scene is now finished and ready to spawn
players so next we need to set up the sender scene:
Step 1 - similar to the receiver scene, create a cubes and
place the wherever you want the player to teleport from and name them
accordingly.
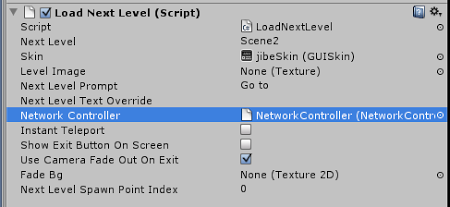
Step 2 - Attach the script LoadNextLevel to each of the sending
cubes and set up the script to look like this:
Step 3 - the last variable in the script is called
"Next Level Spawn Point Index" this is where you choose which spawn
point to spawn at. Remember that list of spawn points you wrote down earlier,
this is where you need it, each index number points to a specific spawn point
and this variable is how you tell the teleporter where you drop the player off.
Everything should be all set up and ready to go so test
away.
P.S. You can also find this article on our
Jibe 2.0 Manual Addenda page in our public Knowledge Base!