Wednesday, July 31, 2013

Oculus Rift and Razer Hydra Integration is Coming Soon to ReactionGrid's Jibe Platform

This short video explains and illustrates the functionality of Oculus Rift and Razer Hydra in a Unity3d-based environment.

The live demo part of this video was filmed in Unity's Tuscan Villa demo environment modified by Sixense, the company that created the Razer Hydra device. We’ll be building on their fantastic work to integrate the Razer Hydra and Oculus Rift with our Jibe platform in the coming months.


At ReactionGrid, we're integrating these new hardware devices with our Jibe virtual world platform, thereby giving people the ability to create their own web-based multiuser 3d environments that are fully immersive.


Wednesday, July 24, 2013

Setting up multiple spawn points for a scene in Jibe and Unity3d

In this tutorial we'll be going over how to set up spawn points when teleporting between Jibe scenes.  By default there is only one spawn point in a scene, this can be inconvenient if you have many exits and only one entrance (ie. buildings). Thankfully setting up spawn point is pretty easy.

First make sure that you have at least two Jibe ready scenes. for the purpose of this tutorial I'll show two blank scenes using the first as a "sender" and the second as a "receiver". Each scene can be used as both "sender" and "receiver" but for simplicity sake I will be separating the two.

Now lets go ahead and set up the receiver scene:

Step 1 - create once cube for every location you want the player to be spawned in and remove any scripts attached to them.

Step 2 - this step is optional but I highly suggest doing it for organization. Name the cubes you created accordingly (ie. clinicSpawn, houseSpawn etc.)

Step 3 - in the NetworkController script there is a list named SpawnPoints. Set up that list to include every point you want to work as a spawn and then write down which index number goes with each spawn point (this will make things easier later).


The receiver scene is now finished and ready to spawn players so next we need to set up the sender scene:

Step 1 - similar to the receiver scene, create a cubes and place the wherever you want the player to teleport from and name them accordingly.

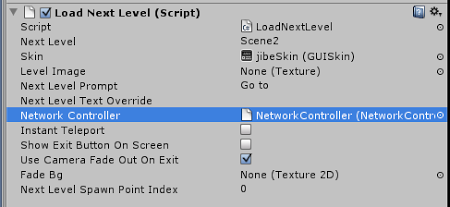
Step 2 - Attach the script LoadNextLevel to each of the sending cubes and set up the script to look like this:


Step 3 - the last variable in the script is called "Next Level Spawn Point Index" this is where you choose which spawn point to spawn at. Remember that list of spawn points you wrote down earlier, this is where you need it, each index number points to a specific spawn point and this variable is how you tell the teleporter where you drop the player off.

Everything should be all set up and ready to go so test away.

P.S. You can also find this article on our Jibe 2.0 Manual Addenda page in our public Knowledge Base!


Wednesday, May 29, 2013

How to create multiuser networked events in Jibe and Unity3d using iTween

In Jibe 2.0 we've included an easy system that gives you the power to use iTween to create multiuser networked events.  This allows you create shared experiences between avatars using interactive and complex object animations.

Watch my tutorial to learn more!


Video: How to create multiuser networked events in Jibe and Unity3d using iTween


Take care,
-John "Pathfinder" Lester
Chief Learning Officer

ReactionGrid, Inc.

Monday, April 29, 2013

How to create Avatar Sit locations on any object in a Jibe world in Unity3d


Here's a short tutorial video that will show you how to create avatar sit locations on any object in your Jibe world.  It's a very powerful and flexible system where you simply drag and drop sit locations onto anything in your multiuser Jibe world, allowing you to easily create collaborative meeting environments that encourage avatars to gather together in groups.
In this video, I also review how to avoid the accidental misuse of a script that could potentially cause your Avatar to fall through the floor.  Safety First!


Creating Sit Locations in Jibe and Unity3d from John Lester on Vimeo.

Take care,
-John "Pathfinder" Lester
Chief Learning Officer, ReactionGrid

Thursday, April 11, 2013

Breakdown of Oculus Rift Virtual Reality Headset and Integrating with Unity3d and Jibe


I'm eagerly awaiting my own developer version of the Oculus Rift, which should arrive in about a month.
My plans are to immediately start working on how to best integrate it with Jibe and Unity3d.  
In particular, our newly released Jibe 2.0 has a built-in 1st-person perspective mode that is ideal for things like virtual reality headsets.


Exploring a multiuser Jibe 2.0 world in 1st-person perspective.  

Keep an eye on this blog for future details.
Needless to say, I was very excited to see the folks at iFixit posting a great teardown of the developer version of the Oculus Rift headset.

If you have an Oculus Rift and would like to brainstorm with me on how it can be integrated with multiuser virtual world applications, please drop me an email (pathfinder@reactiongrid.com) or post in the comments.
Perhaps we can also schedule a Team Fortress 2 game while using our headsets!
-John "Pathfinder" Lester
Chief Learning Officer, ReactionGrid Inc.

P.S.  ReactionGrid's Lead Developer Matthew Bertrand is also getting an Oculus Rift dev kit.  He's pretty psyched about it, and we all expect amazing things from him!

Monday, April 8, 2013

How to embed and play a movie on an object in Unity3d and Jibe


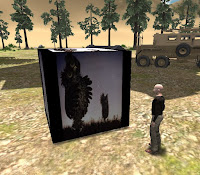
Watching "Hedgehog in the Fog"
in my Jibe world.

Note: You'll need the Unity Pro editor if you want to work with Movie Textures in Unity3d.
Unity3d allows you to embed and play videos on any surface in a 3d environment.
This means you can easily create a web-based Jibe world where avatars explore a multiuser 3d virtual space while watching videos or movies playing on screens/signs/any surface you wish.
The most common way to add video to a Unity3d project is by adding a video file to your project's Asset Folder, which automatically creates a Movie Texture (details here).
However, adding a video file directly to your project means the size of the video file will be added to the final size of your completed Unity webplayer file.  In other words, if your video clip is 50 Megabytes large, then your Unity webplayer file will have an extra 50 Megabytes added on to it.
For folks creating Jibe worlds with Unity3d (or anyone creating Unity webplayer files for streaming on the Web) this is not good.  You always want your webplayer file to be as small as possible so your webplayer file will finish downloading and start running as quickly as possible.
Fortunately, there's a way you can download/stream a movie from the Web so it doesn't add to the size of your Unity webplayer file.  Unity will immediately start playing the movie as soon as it has buffered enough of it, similar to how YouTube works.
Here's a simple example:
Step 1: Get your video ready as an OGG file on the Web

Unity needs videos to be in OGG format (file extension .ogg).  If you need to convert an existing video file into OGG format, I suggest using VLC (it's free and cross platform).  Take your OGG video, put it on a webserver somewhere and remember the URL.

Important Note: If you're managing your own webserver, be sure it has the MIME type for Ogg Vorbis enabled.  For Extension use .ogg, and for MIME type use application/ogg.
Here's a sample 60 Megabyte OGG video I made and uploaded to Wordpress.  Feel free to use this URL in your own tests.  You can also click on it to see how it plays in your browser.
http://becunningandfulloftricks.files.wordpress.com/2013/04/hedgehog_in_the_fog.ogg
Step 2: Create a Cube


In this example, we're going to make a basic cube and have the video play on its surface.  Of course you could flatten the cube so it looks likes a screen and then place it on a model of a TV or something.  I'm just being lazy.

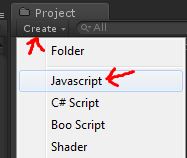
Step 3: Create a new Javascript


I like the name of a script to remind me what the script actually does, so I'm going to call this new script ClicktoPlayWebMovie.


Here's the code.  Copy and paste this into your new script and save it.


var url = "http://becunningandfulloftricks.files.wordpress.com/2013/04/hedgehog_in_the_fog.ogg";
function OnMouseDown () {
 // Start download
 var www = new WWW(url);
// Make sure the movie is ready to start before we start playing
 var movieTexture = www.movie;
 while (!movieTexture.isReadyToPlay)
 yield;
// Initialize texture to be 1:1 resolution
 renderer.material.mainTexture = movieTexture;
// Assign clip to audio source
 // Sync playback with audio
 audio.clip = movieTexture.audioClip;
// Play both movie & sound
 movieTexture.Play();
 audio.Play();
}
// Make sure we have audio source
@script RequireComponent (AudioSource)
function Update () {
}
You can see at the top of the script that I've included my demo URL as the default movie URL.  You can always change it later.
Step 4: Add ClicktoPlayWebMovie script to your cube


Drag the ClicktoPlayWebMovie script from your Project folder onto the Cube in your Scene view.  This will add the script to the cube.


Now select your Cube in the Scene view and look at the Inspector settings.  You can change the movie URL by simply editing the URL field in the Inspector.
Also notice that there is an Audio Source added to the Cube.  This was added automatically when you added the script to the Cube, since the script needs an Audio Source component to work.  Don't delete or modify the Audio Source component.  Just leave it be.


Step 5: You're done.  Test it out!


You can run your Jibe world locally in the Unity editor and test it out that way.  Walk up to the cube and click on it.  The movie will start playing on all surfaces of  the cube.


Enjoy!
-John "Pathfinder" Lester
Chief Learning Officer, ReactionGrid Inc.

Tuesday, April 2, 2013

How to Fix the Unity Asset Server error "Cannot Start Service" on Windows

The Unity Asset Server is a fantastic tool for version control and collaborating with a group of people on a project in Unity3D.  Our customers primarily use Windows servers, and some of them are running their own Unity Asset Servers to facilitate working together on Jibe projects.

We just learned of a bug that might affect folks running their own Unity Asset Server on Windows.  Fortunately it's not serious at all (just annoying as heck), and the fix is incredibly easy and permanent.  

Are you running the Unity Asset Server on a Windows machine?

Has it suddenly stopped working, refusing to start no matter what you do?

Do you immediately see the following popup error when using the Unity Asset Server Control Panel?